Black Box Hurricane performance- Anybody have any decent amount of time working with the Hurricane? Is it worth the chunk of change to buy it- I have/will have a 60-120" Avid Pro system
I had one before I worked at Avid on my 4x8. It worked awesome. Best bang for the buck if you’re on 220 single phase and don’t want to shell out for a 3 phase rotary vane.
The secret to making them work well is a good plenum. Don’t skimp or take shortcuts here.
I have seen pictures of various plenums… Is there a set a of plans that shows how it is done best? What zones and materials to use -
What was the experience with regards to small ish items? Coasters etc?
I’ve been looking into the airweights system. And they use a gasket to localize the suction for smaller pieces. Have you checked that out?
I’ve been using the Airweights 2’x4’ on my machine and it works well. I have 1/4" holes for indexing pins in my spoilboard for repeated alignment. I used the machine to drill these as well as the holes for the fasteners where I installed t-nuts from the underside to mount/remove the platen as needed.
It uses a low velocity pump though so if you were making full through cuts in a full size sheet of ply it will lose suction quickly. The hurricane is a high velocity pump that I believe can overcome the “leaks” from the cuts.
I do like the Airweights system for fixure plating small parts though.
I’ve been using a black box cyclone for about 4 years now on a smaller 2x4. It is overkill for the size table, so I added switches to control the 3 motors individually. I typically run 2 motors. It helped us go from TONs of workholding issues to virtually none. If I’m running small parts, I throw a rubber mat over the areas I’m not using to mitigate the suction loss. Some small parts I run on a fixture but all sheet goods are cut with the black box… If a part is smaller than about 2" wide, I typically run a tab or two just to make sure things don’t get out of hand…
I just bought a 4x8 pro second hand and I bought a hurricane to go with it. I have vac board cut and the manifold plumbed, I just need to run 4 pipes and glue on the top spoil board… I am 600 miles away from it, so I’ll get it dialed in on my next trip to my new shop. Once I get it dialed, I’m planning to batch out a few vac boards and offer them for sale. I’ll use a latex paint on the outside faces and ship in 4 sections so it will operate in zones without using a gasket. Not sure if there’s a market for that, but there’s only one way to find out.
Sounds like it is a decent product. Mine is a 5x10 so it is on the outside of its capacity. Hopefully I can figure out how to use the zones to be effective at all sizes - but especially so on the first 3 feet where most of my work will get done… Any suggestions or plans on how to build a proper plenum? It sounds like you are on the right track- sealing things with latex paint. Is there any value to building the honey comb areas out of 4/4 MDF and creating a larger/deeper low pressure zone from under the situation? I am not an engineer and lack the science to figure out the values…
I built my own for about $1000 and a day of labor. For the plenum I used 3/4 Baltic birch sealed with polyurethane and routed a grid for all star gasket material. Plumbed this all with 2" PVC to the plenum and 3" PVC from the vacuum to the shut of valves. I am using 4 motors and split them off into pairs on a switch for each pair. I am using ultralight MDF for the spoilboard. From my research the central vac motors are high CFM and low vacuum so the extra flow of the ultralight helps maintain the vacuum pull.
I have a few hundred hours on these motors and hundreds of nested sheets run through. Works great for me and cant beat the price.

Motors are Ametek 122178-18 220V
I would be interested in your full build process- not to say that I am as adventurous as you appear to be. I will probably buy more of a turn-key setup. Building my own AVID Pro has me scared all ready.
I wish that I had your skills to save me the extra $2,000 bucks.
I have a Hurricane on my PRO 60120. I bought the Avid used and it was included from the seller with the machine. I’ve been using it for almost 2 years. I think it does great with sheet goods (acrylic, wood, PVC/Sintra/KomaTex), which is how I use it. Small items could be challenging depending on the object size, location, and your speeds & feeds. If it is a smallish object and I don’t want to move during a cut through operation, I’ll use tabs. I have had items move on me, but the larger sheet it was cut from stays in place really well.
I’m not sure what the vacuum bed plenum looks like under the spoil board, because I didn’t make it and I have not removed the spoil board yet. But it seems to be 3 layers of MDF for the vacuum table and the top MDF sheet is the spoil board. Looking at the underside though, the first layer has a bunch of dog holes, so I’m wondering if the vacuum bed is just sitting on top of that and is just 2 layers, not 3???
It has 4 zones plumbed to the Hurricane with individual valves. With this setup, it’s actually a 5x8 cut area not 5x10, but that is fine with me for how I use the machine.
The humidity in my garage causes expansion/contraction enough to make me irritated sometimes with the DOC. So I’ve been looking at replacing the MDF plenum with a 5x10 phenolic sheet. That will probably cost me $2500-$2700 delivered, so I might put that money towards the ATC instead. Having ATC would speed up my production and for my small side hustle business… time is money and more important than the minimal accuracy discrepancy.
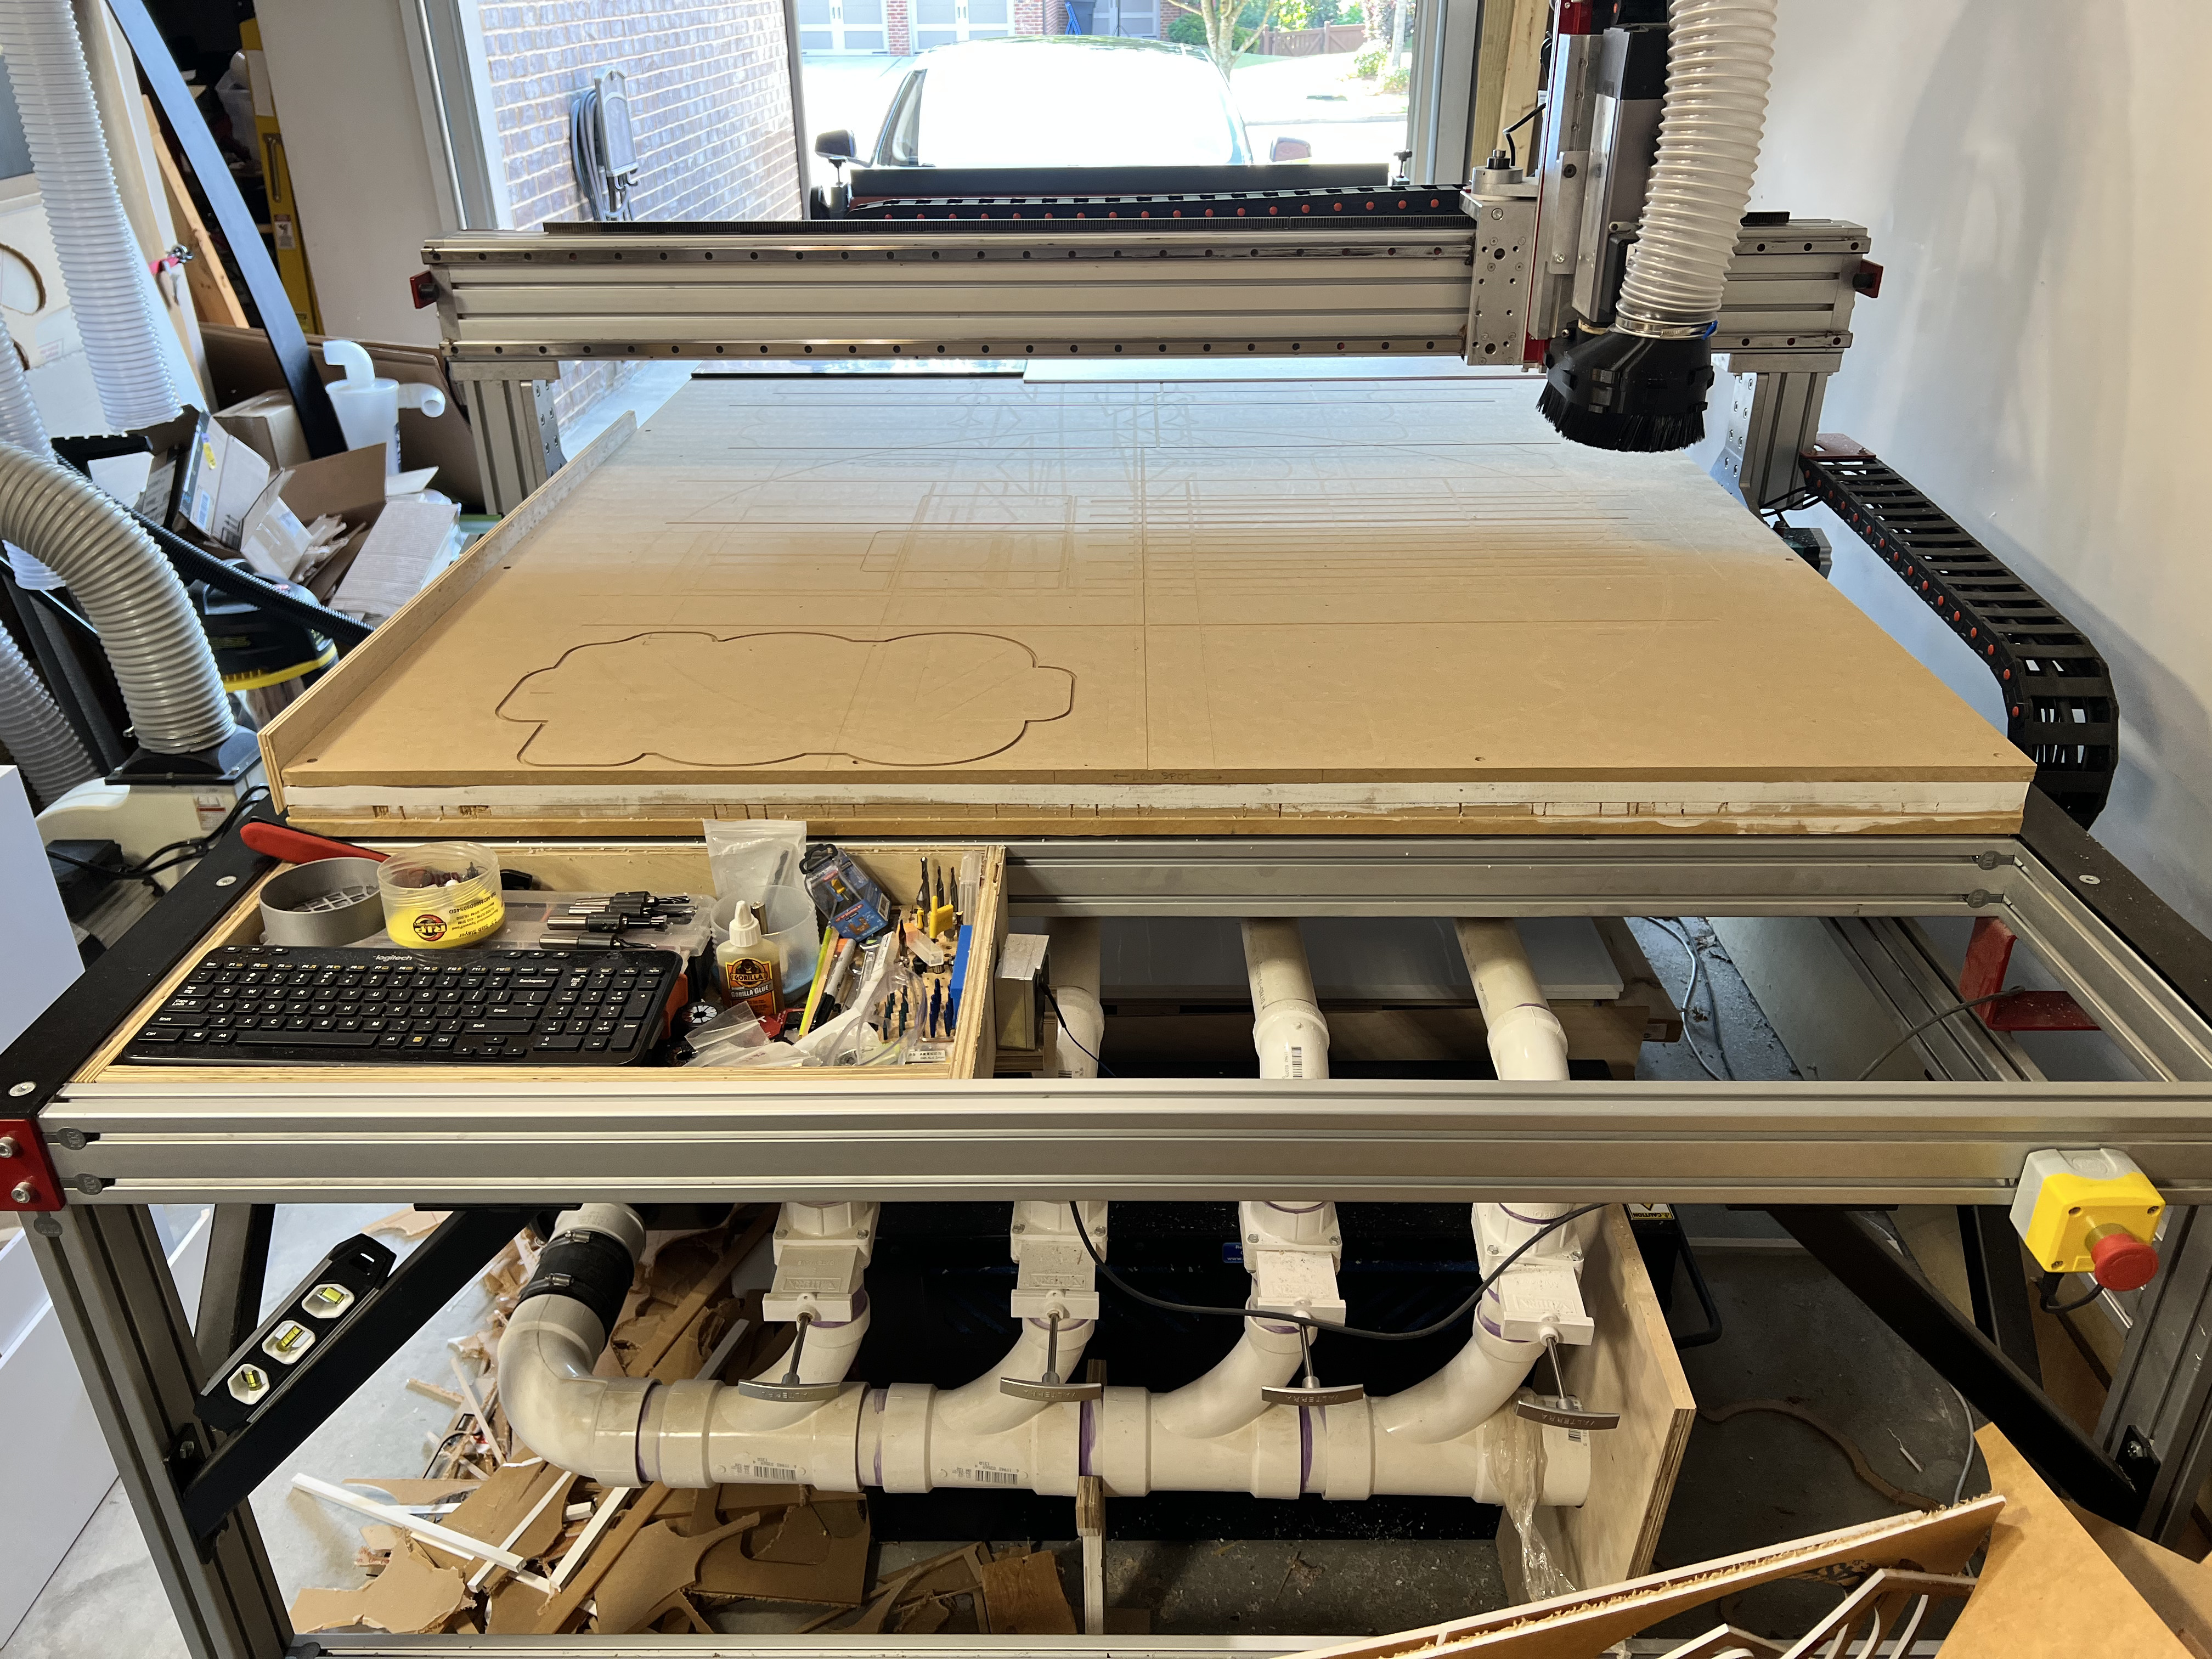


Stubborn and cheap leads to adventure I suppose. Ups and downs, strikes and gutters. It is much simpler than you think though.
The biggest thing is having and inline air filter. Anything getting into the suction side of the motor will kill it in short order. I got a canister filter with 3" inlets cheap from Alibaba.
Ill try to give an explanation with some additional pics. Everyone’s needs vary so you can tailor this basic concept. The picture of the motors in the last post is showing the cooling air side directly in front. on the opposite side is the suction side. Vacuum pulls from there. this is what pic 1 PVC manifold is attaching to. The snail shape part pointing down is the exhaust. I put some cheap mufflers on this side. Basically foam lined PVC. You can buy most of this stuff through central vac suppliers. The 3" PVC in the pic below is the mounted to the opposite side of the motors in the first post picture. I used toilet flanges siliconed and screwed to the box that the motors are mounted to. You will need to order gaskets for the motor side and not tighten them down too tight. I used bolts with double nuts to “suspend the motor on the bolts while tight enough against the gasket to seal. Upstream from that would be a canister filter from there it goes to shut valves for your zones Pic 2. After the shut off valves transition to 2” PVC to your plenum. Pic 3 is the underside of my 3/4 baltic birch plenum surface. Pic 4 is the top of the plenum. It is not hollow. It is a simple single sheet of material bolted to the CNC frame. The plenum is created by using the routed grid pattern, spoilboard and gasket material in between the two.
Get creative from here with your materials you have or can find and just make sure everything is sealed airtight. Then enjoy your $2000 some other way.
If you do a search for the motors you can find them for around $200 each


I did the same as MeanGreen619. I built my own based on an old article posted to the ShopBot forums by Gary Campbell. Except I used 6 central-vacuum motors instead of 4. Here is the original article https://www.talkshopbot.com/forum/showthread.php?11813-Black-Box-Vac-Source
I built a wood box like that myself and ran it in production for a few years. When those motors fail (and they will) they can spark. I walked into my shop one day and decided I didn’t want to take that risk and I ordered the Black Box for that reason.
I have a home built 4 motor clone of the hurricane. The plenum is melamine sealed with polyurethane or epoxy (I don’t even remember).
It works well for holding down sheets and cutting cabinet sized panels. Smaller parts or sheets with many cuts will still likely need tabs. These things are extremely loud, generate heat, and that much moving air can quickly start fires. Something to keep in mind.
I’m on a 60x120, btw. I don’t really do sheet goods anymore. While I’m not getting rid of it, I actually really miss having t-tracks, dog holes, and other hold down mechanisms that you can’t do with a huge smooth slab of MDF.
I actually have the AirWeights system also, so it is a vacuum table screwed down to a vacuum table! For the stuff I do, AirWeights works much better.
My next spoil board setup will probably shrink the vacuum section down to 60x60 for true baltic birch sheet handling and use the rest with more traditional work holding and AirWeights fixtures/jigs.
For the spoil board and vac board… 1/4" deep x 1/4" wide grooves on a 2" grid pattern are all you need to distribute the suction. Run 3" to your manifold, then 2" to your valves and your vac board. For the Vac board, I would recommend something like 3/4" Medex MDF. You can order it at the pro desk at Lowes. It’s moisture resistant, so humidity changes won’t hurt it. For the top spoil board, skim off a 1/64" pass, then flip it so the skimmed off side gets glued to the vac board… Once it’s glued down, skim the exposed face… Use CHEAP 3/4" MDF for the spoil board. You want it to be porous and pass air. You can paint the edges of the spoil board and you can paint the edges and bottom of the vac board.
One last detail… I’ve noticed that under vertical pressure (drilling, ramping, plunging) the spoil boards can flex between the Avid’s crossmembers. It’s no big deal if you’re doing cookie cutter type parts. If you have precise pocket depths or are carving, I would recommend adding support along the edge of the Y axis. I used angle iron bolted to the 80-20 tubes. You could also cut MDF strips and attach them to the 80-20. I also ran a piece of steel down the midpoint of the machine because I need ZERO movement in the spoil board.
Do you have a sketch or drawing of the plumbing that you did for the Hurricane and for the plenum and zones? is there value in setting the zones to different percentages based on the time and area that I use most? I want to be able to cut out cabinet parts as well as fine 3-d carving in less-than 12" square pieces.
The last pick @meangreen619 posted is what I would recommend. 4 zones works really well. I would skip the gasket material, but that’s me. I have always covered unused zones with a rubber mat. I use toolbox drawer liner from Lowes. It’s easy to cut to size and rolls up for storage when not used. These vacs are strong, so you don’t need to have perfect coverage, just get most of it. keep your zones simple and just cover the unused portions.
I would suggest T slots, clamps, or screw hold down for small 3d part carving. Like the others have said, the motors create heat, use electricity, and are loud. Like running a couple of cheap plastic shop vacs at the same time. The Hurricane is most likely quieter. If you have close neighbors they will get tired of hearing them. I run a nested sheet in about 10-15 minutes, shut the motors off, and unload the the parts in about 5 minutes. So the motors have a bit of rest in-between running. I don’t usually run these for more than 30 minutes continuously. Although I will use them with the intermittent breaks I described for 4-5 hours. I don’t see the point of using the energy and listening to the motors for 3D Carve work. You can integrate the T slots into your plenum grid as needed. Or have a scrap of material you can screw your part to and T bolt that to a track or have a pattern of threaded inserts in your plenum. There are a bunch of workholding methods that can work well, while still having a functional vacuum plenum for nested work.
The Shopbot forum post looks like a great set up. The Hurricane is a proven system that is plug and play. Good news is there are options. Once you get your machine assembled your abilities will broaden and your specific needs will become clearer. It seems like you are getting good advice from the forum.
I haven’t had my hands on a Hurricane, but the DIY versions shown are the same general architecture and motors. They are metal which is better for fire safety and most likely have overload protection. Plus factory support, so the price difference does have advantages. They can probably give you detailed plumbing advice for you needs as well. Something to consider. I definitely considered getting one before making my own. I was coming from a set up with two 7.5HP Becker rotary vane pumps, so I was a little skeptical that this design would work well, but I am pleasantly surprised by how well it works. The Becker pumps are $12K each. If you are running nested based 10 hours a day 6 days a week that is the set up. A few of hours a day a few days a week then the Hurricane style will be great. So ROI based upon actual usage is a big factor as well.
Same here. I run my DC for the roughing passes, and then the finishing pass only has about 0.060" to go, and with a small diameter TBN bit, the chips don’t go anywhere, so I just turn off the DC and let the junk sit on top and then blow it away or vacuum it up when its all done.