Has anyone be able to use a dock pro from Opt lasers to be able to swap between the 15 watt and the 45 watt laser. I know the controller changed and the power supply changed so i don’t know if the 15 watt can be used with the higher power or not.
I love the 45 watt laser but i have an on going into perpetuity project that we make leaves to put on our tenure wall at work when an employee reaches 20 years of service. We had an outside source make the starting point but i am making the new ones and replacements when an employee reaches 20 years or retires and the 15 watt is a fine enough laser to make them very sharp and readable but the 45 watt even when set to 2x2 instead of 2x4 is just like using a framing hammer to do fine furniture making, just the wrong tool for the job.
So i thought if i could just swap the lasers when i need to do the finer detailed work that would be awesome. Any advise?
First, yes you can use the pro dock and pro adapter to run any of Opt’s lasers, as long as they run on 24 V. I run the XT-8 and XT-50 on mine, and the 15W should be fine as well. If you are set up for the XT-8 then you already have the big power supply so going down to small lasers is not a problem. They all use the same control.
Now after saying that, you should not be getting worse results with an XT-8 than the old 15W laser. The XT-8 has a more symmetrical beam (closer to square than a rectangle), where the square is about in the middle of the long and short dimensions of the 15W’s beam for the 8 diode mode. Of course to get the same engraving depth you’d have to dial down the power on the XT-8. Running in the 4 diode mode should should get an even finer beam.
Are you sure you have the focus optimized on the XT-8, or maybe you have a dirty lens or something?
I have been using the new laser and ex system for maybe 3 months so I’ll give you a solid not sure I have been using the gauge block to set the focal distance, it does seem like i have gotten better results at first but i am also using a prefinished wood that could be adding to the refraction maybe.
The one on the bottom left is the new laser, i tried turning the power down and it couldn’t burn through the finish and then the power too high made it blur really badly.
I generally try not to finish before lasering just because finishes tend to boil and blister when lasering so it requires extra sanding and a final finish coat anyway.
However, a clear finish should not inhibit a diode laser as it is blue light and if you can see through it, the laser will also go through it just fine.
I would guess you are out of focus or have a lens/diode problem that is blurring the laser spot and making it bigger. That results in a lower power density and a big, fuzzy beam that doesn’t give good results.
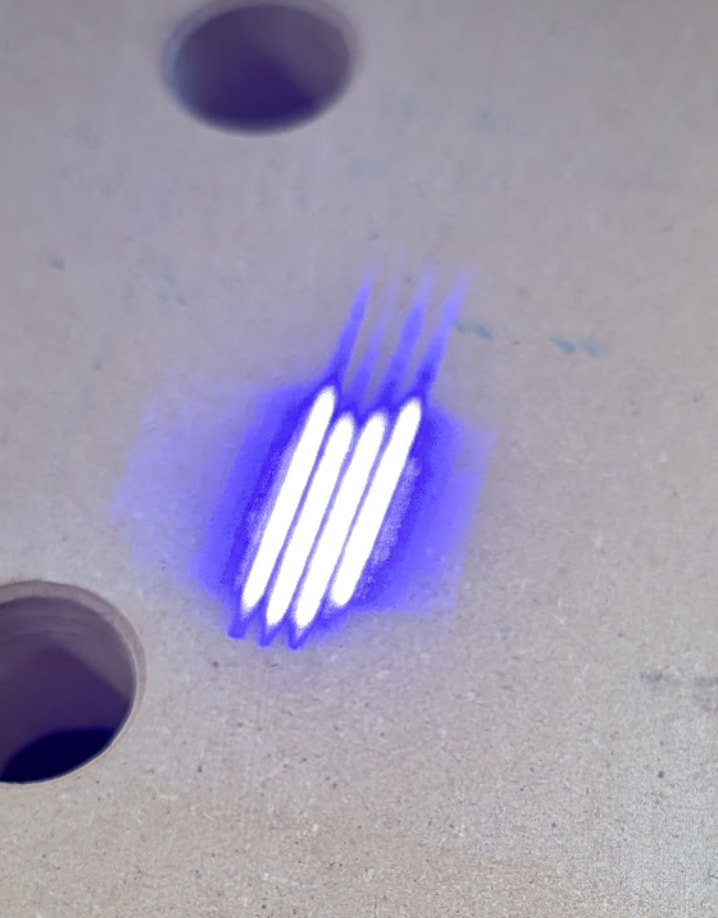
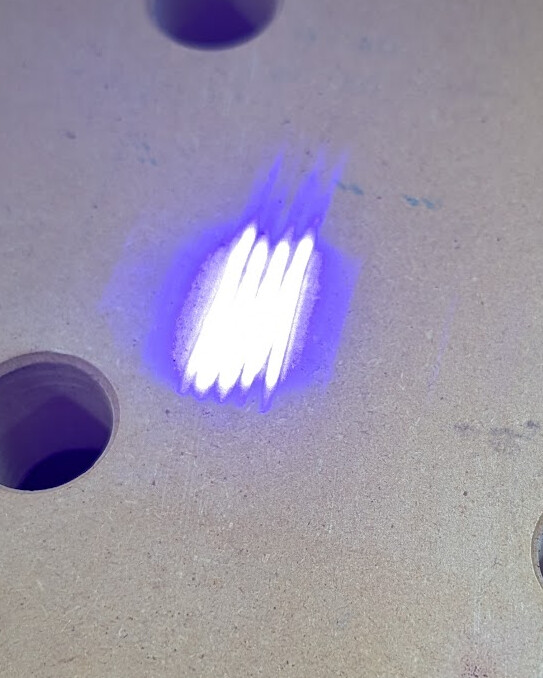
To see if you have an optics problem, Z up 6-8 inches or so and look at the beam in a low power test fire.
In 4 diode mode, you should see 4 diode images. They won’t be perfectly aligned, but they should all be the same size and intensity.
Make sure all 8 diode images are present and that no area of the rectangle has any holes or major abberations (that would indicate a damaged diode or optics, or dirt in there).
If the edge has a round shape, make sure your air assist nozzle isn’t out of position and blocking the beam (thats pretty easy to do when installing the nozzle).
I now do it on anodized aluminum business card blanks because they give much clearer results, just make sure you wipe off the soot after each run before you look at the lines.