I’ve implemented a handful of upgrade projects to various machine tools here in the studio. This one is a “nice to have” change for the ~20yr old Grizzley Industrial 20ton Hydraulic press. This press works great for most things I do in the shop but there are a few things it ‘could’ do a little bit better.
One piece I wanted to add was a “speed-handle”, where I could pre-position the RAM of the hydraulic press and not have to crank it so far up / down in-between setups / pressing operations.
There project started out with a quick look on eBay to see what kind of appropriate materials were in my project budget range that could stand up to the repeated application of ~20tons. Some quick searching turned up 9-in drops of 2in-4tpi ACME and I was able to track down some surplus nuts.

I turned down the nut to 2.5in-O.D. and prepped it to slip fit into some heavy wall 3in steel tube.

A short amount of time was spent cutting through the mill scale on the outside, and taking only the tiniest skim cut on the ID of this material for the slip-fit of the nut, from above.

I cut an end plug and after some heavy weld prrep, I managed to lay in one of the cleanest “heavy-welds” of my life. Yup, still learning.

Next up it was over to the AVIDcnc with some 1/4in stainless steel plate to make the “handle” portion.
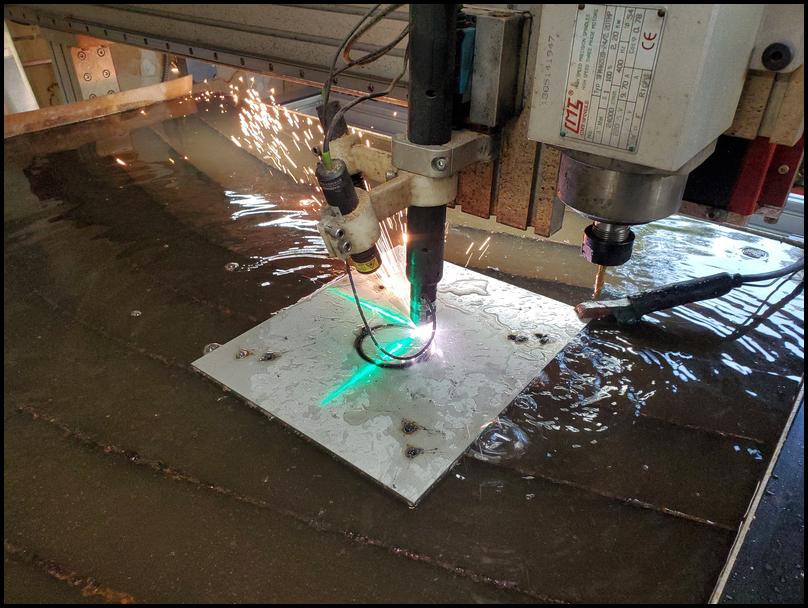
In a complete display of USER ERROR, I ran this cut a bit tooo slow and in thicker stainless, the THC on the plasma cutter is quite unforgiving. The machine ended up diving into the part and knocking off the magnetic torch holder safety disconnect, 2x different times. (see below) I usually set a heaveri chunk of steel on the edge of a small piece like this, and this time I didn’t so when I re-connected the magnetic torch holder, the plate had moved some, both times. Yes, that was a hard lesson to “re-learn” given that I know better. I rarely have THC issues and when I do it always seems to happen in stainless. This one was quite avoidable, However, I was experimenting with feeds/speeds since I’ve not cut thicker stainless before (just lots of sheet stock previousl, 16Ga and below).

I cut a little guide ring, clamped it to the part and went back in with the hand torch to open that center hole up. This worked out extremely well.


To re-align the through holes in the handles to accept pass through dowels for the wooden handgrips, drilled and reameds some holes in the tops of some soft jaws and pressed in some dowel pins with the palm of my hand. (Tight slip-fit). This allowed me to index the parts on the mill and I was able to use an end-mill to correct the holes with simple slow / controlled plunge cuts.

After this, the handle frame was welded to the barrel / RAM assemly. This was done with ER908L wire as the weld was connecting aloy steel tube to stainless steel. I would up with a bit of splatter but all in all this came out great. I did not crank the heat all the way up on this, even though it is thicker material, as this only needs to be strong enough to take hand pressure.

Next up, it was back out to the garage to the spindle side of the AVIDcnc. I had saved the corners of the planks from the Entryway Table Project just for this use. After a few short minutes they were squared up on the radial arm saw, marked and drilled and screwed down to the swarf board. All that was left was to turn the router loose on them. The cutting on all the parts was done with a 2-fluted up-cut carbide 1/4-in ball end mill.


These came out great. In the back row in the photo, below, you can see that I made a mistake on 3 of the parts before I caught it. I had the holes for the dowel pins miss-alligned from the back side, and those poked through the top surface. I had just enough left over wood to re-make those.

This is a preview with some of the doweling mocked-up in place.

I took an extra few minutes and did a test-mockup with the rest of the assembly as well. So far so good.

Further above, when I laid in that extra heavy weld, I was concerned about how much the weld might distort these nuts. It turns out that was a valid concern and I had to use all my body strength to drive that tap back through the part. It removed a surprising amount of material on the way through. Those are 16in pliers in the photo and before I was done they had a pipe and a hose clamp on them. ![]() 2in-4tpi full ACME thread profile is pretty serious.
2in-4tpi full ACME thread profile is pretty serious.

After this it was back out to the garage to finish up the wooden hand-grips… Some super light sanding in-between coats of polyeurethane did the trick. The photo below was snapped while the first coat was still wet. The grain in teak always speaks to me.

And then to start working on the attachment to the press. Here I’m using the chop saw to slice off a ~5/8in worth of another nut to aid in positioning/fixturing while welding. This will be welded in place on the thread and become a permeant part of he assembly.

I also took a an hour and set up to knock out a quick run in the powder coating oven.

Then back over to the water table / plasma side of the AVIDcnc to knock out a piece of mounting plate.

This part is cut from 1/4-in mild steel and as such needs almost no cleanup.

I used an angle grinder to cut the old ram out of the pressing tray from the hydraulic press.

After that it was just a matter of marking and drilling some holes as well as a quick few steps of that old classic, the “rattle can dance”.

All in all this project turned out the way I had envisioned it.


Maybe, just maybe this project might inspire others to take a look at equipment in their project spaces and question if there are improvements, they might consider making…?
-Kenneth