With prompting from Corbin I'll relate the construction of this machine. First a warning; the pictures I have are not digital so what will be shown here are "pictures of pictures" which I found hard to do without any glare.
My CNC router journey started with "acquiring" 3 vacuum column tape drives (HP). Each had 2 4" dia DC servos and a cute very quick capstan motor. And as a bonus there were manuals with schematics of the power supplies and servo amps and cabling. About that same time I was learning at work about "intelligent motion control" using Galil products. Galil controllers are used with motors and encoders to provide closed-loop control.
I should point out that I had almost no machine tools at this time; just a drill press. The lathe work was completed on a lathe at the technical college where I worked. Of course I had an arc welder as well as an oxy/acetylene cutting torch as well as a power hacksaw. The machine is designed to be dis-assembled for moving. Construction was done in the garage and later it was moved into the shop. And later when I sold it everything fit easily into a 1/2 ton truck.
Construction was completed without any painting, followed by a complete tear down to paint everything. As the machine was re-assembled I took these pics.

In CNC1 the main frame is shown. The base is made from rectangular tubing 8.5"x2"x0.125" wall. The length of the side closest is 81" and the other side is 64". Legs are 3"x3" angle stock with flat bar feet and no levelers.The small protrusions on the top of the sides are for mounting the rails. The threaded stock extending from the bottom of the sides will hold cross channels for bearings and motor mounts. Brackets on the inside ends will support the table. Not easily seen are brackets for cross ties for squaring and jacking bolts for adjusting parallelism.

In CNC2 the Y axis motor is installed along with the lead screw and nut. The encoder is mounted on the far end of the lead screw, not normally regarded as good practice.

In CNC3 the table sub-frame is installed. There are 4 level/height adjusting screws. The cross ties are also in place now. Rails are in place as well; they are 1" cold-rolled round stock. Round stock was chosen thinking more dust would fall off it as opposed to square stock. Turns out lots of dust collected on the round stock and required constant cleaning.

In CNC9 the x axis frame is shown; it’s all aluminum. I found a great buy on some aluminum channel at a scrap yard. Where possible everything that moved was aluminum. Six bearings will be mounted on each of the large angles on the ends.

In CNC11 the carrier for the z axis is shown along with more bearings. The bearings were permanently attached to stub shafts using a couple of serious center punches; might use snap rings next time.

In CNC12 the z axis carrier is in place,The x axis motor is installed with encoder on opposite end of the lead screw again. Bearings are also installed for y axis travel.

In CNC4 the table top is in place. It was 3/4" fir with 3/4" particle board on top.

In CNC5 the x and z axis are in place. The first z axis was kind of crude; it was just up or down; no other control. The z axis unit came from some sort of medical equipment I got as surplus. The triangular frame will support the cables for the z axis. A swivel is at the top and the cable loops to the z axis and stays clear. The upright on the near left corner is for the x axis cable. It will loop downward but not bend much. The y axis cable goes to a fixed connect on the frame near the E-stop ( not visible here).

In CNC16 the first z axis is shown in isolation with a side cover removed. The router mount is ready to be attached.

CNC17 shows the first z axis with router mount installed.

In CNC6 the second version of the z axis is shown. The black motor has an encoder mounted on the back but didn’t appear dust-proof, hence the plastic bag protector. This shot is with the machine in my shop and working on some CD holders. I made many CD and floppy disk holders; yes, the 3.5" size. Here you can also see the z axis cable/swivel combination.

CNC10 is a closer view of CD holder construction.
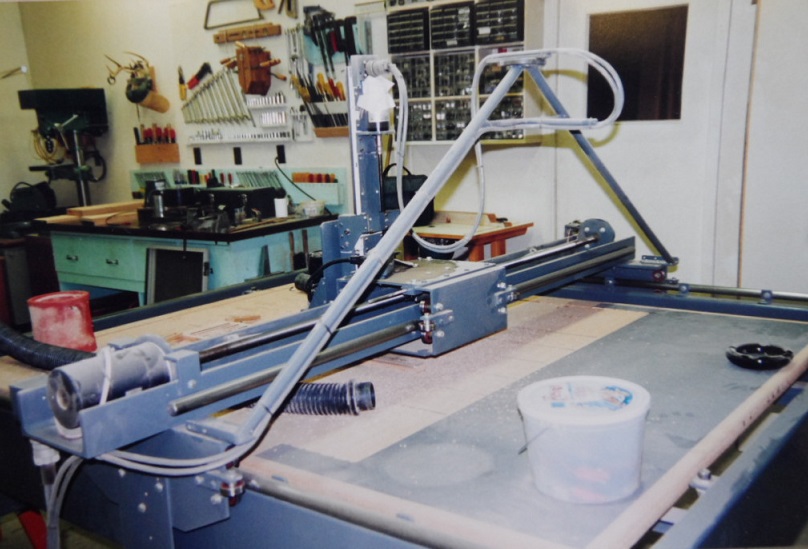
CNC7 gives another look at the machine from a back corner. Yes, that’s an ash tray in one corner; I smoked back then but have since quit. My dust collector then was my shop vac; it worked OK.

CNC8 is a look from the front of the machine. On the RHS kind of behind the shop vac is the x axis cable support.

In CNC15 you can see the cabinet that once housed a vacuum column tape drive. Yes, I’m pretty sure that’s an IBM XT in the cabinet with a dual 5.5" floppy drives. The lower portion of the cabinet houses the power supplies and servo amps. The lower front panel was extensively modified.

CNC13 is a look into the back of the cage holding amps and power supplies. The servo motor supply was bipolar and had 2 VERY large electrolytic caps with the bottoms just visible center right. They were about 3.5" dia and about 12" high. The wiring and circuit board on left side is mine.

CNC14 is a view into the back of the cabinet. The plain box with large cannon connectors is mine. The 3 cables go to the machine for power, encoders, limit switches etc. The 40 cond ribbon cable is from the Galil DMC630 controller.
That’s the end of the story of my first machine. It did quite a bit of work but had some serious deficiencies. Galil controllers are programmed in an “assembler-like” language. There was a simple app to convert from a DXF drawing into Galil code. No gcode. There was no MPG so positioning for start was done from the keyboard a few steps away. The long lead screws would “whip” if you tried to go too fast. I did better on the second machine which I may post in the future.